

introduction
On a hectic Tuesday, I found myself juggling homework help, soccer practice logistics, and a hungry five-year-old who wanted something sweet right now. I needed a quick, no-fuss treat that felt special but didn’t add more work to the day. I pulled out cream cheese and peanut butter, whisked them together, and layered the fluffy mix into small jars while the kids set the table. Two hours later, we dove into creamy, peanut-buttery cheesecake that felt like a mini celebration. These No-Bake Peanut Butter Cheesecake Jars became our easy weeknight dessert, the kind I keep in the fridge for surprised guests or for when the afternoon slump calls for a little comfort. They are simple, rich, and just the right size for a family treat.
why make this recipe
This recipe works when time is short and you still want something homemade and comforting. It needs no oven, so it stays cool in the summer and saves energy year-round. The jars look pretty and help with portion control, which parents appreciate. You can make a batch ahead, and each jar stays fresh for snacking, dessert, or a quick pick-me-up. The ingredients are common, kid-friendly, and store well in the pantry or fridge. If you follow a lower-carb plan, the recipe already offers a keto-friendly sweetener option. For blogging and Pinterest, the visual appeal is strong: creamy layers, smooth tops, and the chance to add chocolate, chopped peanuts, or a drizzle for gorgeous photos.
how to make No-Bake Peanut Butter Cheesecake Jars
Making these jars is mostly about texture and gentle folding. Start by getting the cream cheese soft so it blends smooth with the peanut butter. Whip the heavy cream separately to full volume so the final filling stays light and pillowy. The key move is folding the whipped cream into the peanut butter-cheese mix with gentle strokes; this keeps air in the filling and gives you that silky cheesecake feel without baking. Spoon the mixture into jars and smooth the tops for neat presentation. Chill long enough to set so the flavors meld and the texture firms up. Simple tools, like a hand mixer and rubber spatula, make the process fast and tidy.
Ingredients :
8 oz cream cheese, softened, 1/2 cup peanut butter, 1/4 cup powdered erythritol (or other keto-friendly sweetener), 1 tsp vanilla extract, 1 cup heavy cream, Pinch of salt
Directions :
- In a mixing bowl, beat the cream cheese and peanut butter until smooth., 2. Add powdered erythritol and vanilla extract, mixing until well combined., 3. In a separate bowl, whip the heavy cream until stiff peaks form., 4. Gently fold the whipped cream into the peanut butter mixture., 5. Spoon the mixture into individual jars or serving cups and chill in the refrigerator for at least 2 hours before serving.
how to serve No-Bake Peanut Butter Cheesecake Jars
Serve these jars straight from the fridge once they are set. Top with a sprinkle of crushed peanuts, a few dark chocolate shavings, or a thin drizzle of sugar-free chocolate sauce for contrast. For kids, add mini chocolate chips or a small dollop of whipped cream. Serve with spoons tucked into the jars for a casual feel, or place on a small dessert plate with a biscotti or low-carb cookie for a more polished presentation. These jars work well as party favors too — tie a little ribbon around the lid and set them on the table.
how to store No-Bake Peanut Butter Cheesecake Jars
Keep the jars in the refrigerator covered with lids or plastic wrap. They stay best for up to 4–5 days. If you need to freeze them, leave out any crunchy toppings and freeze for up to 1 month. Thaw in the refrigerator overnight before serving; the texture will soften a bit but remains enjoyable. Always check for off smells or changes in texture before serving, especially after several days.
tips to make No-Bake Peanut Butter Cheesecake Jars
- Use room-temperature cream cheese so it blends without lumps. Cold cream cheese leads to a grainy texture.
- Choose a creamy peanut butter for smooth filling. Natural peanut butter with oil separation can work but stir it well first.
- Whip the heavy cream until stiff peaks form; under-whipped cream will make the filling dense.
- Fold gently but thoroughly. Use a rubber spatula and lift through the center, turning the bowl to keep air in.
- Chill for the full two hours or longer for a firmer set and cleaner spoon cuts.
- For extra shine, smooth the top with an offset spatula or the back of a spoon dampened with cold water.
- If you want sweeter jars, swap the erythritol for powdered sugar 1:1, but note the carb change.
variation (if any)
Try a few simple variations to keep the jars interesting. Add a layer of sugar-free chocolate pudding or melted sugar-free chocolate between the filling and crushed nut crumbs for a chocolate-peanut twist. Stir a tablespoon of cocoa powder into half the filling to make half chocolate, half peanut butter jars. For a crunch option, add a thin crust layer at the bottom using crushed low-carb cookies mixed with a little melted butter. If you are not keto, substitute powdered erythritol with powdered sugar or brown sugar for a softer sweetness.
FAQs
Q: Can I use crunchy peanut butter instead of creamy?
A: Yes. Crunchy peanut butter adds texture and a nutty bite. Mix well so the large peanut pieces distribute evenly. Consider crushing some pieces smaller if you prefer less chunkiness.
Q: What if my heavy cream won’t whip to stiff peaks?
A: Make sure the cream is cold and your bowl and whisk are clean. Chill the bowl and whisk in the freezer for 10 minutes before whipping. If it still won’t whip, the cream may be low-fat or old; use fresh heavy cream labeled for whipping.
Q: Can I make these with a sugar-free flavored peanut butter?
A: You can. Check the ingredients for texture and added sweeteners that might change the taste. Adjust the powdered erythritol down if the peanut butter already has sweetener.
Q: How do I make the jars look pretty for photos or parties?
A: Keep the tops smooth and use small, consistent garnishes like whole peanuts, a chocolate curl, or a mint leaf. Use small clear jars for clean layers and natural light for photos.
Q: Are these safe for people with peanut allergies?
A: No. For peanut allergies, swap peanut butter for almond butter or a seed butter like sunflower seed butter. Adjust flavor expectations and garnishes accordingly.
Q: Can I double the recipe for a larger crowd?
A: Yes, double everything and mix in a larger bowl. Beat the cream cheese and peanut butter in batches if your mixer struggles, then combine. Use more jars and chill the full batch the same way.
Conclusion
If you want another jarred dessert idea with rich flavor and strong visual appeal, check out this chocolate and peanut butter jar version as inspiration: Chocolate Peanut Butter Cheesecake in a Jar – Barbara Bakes™.
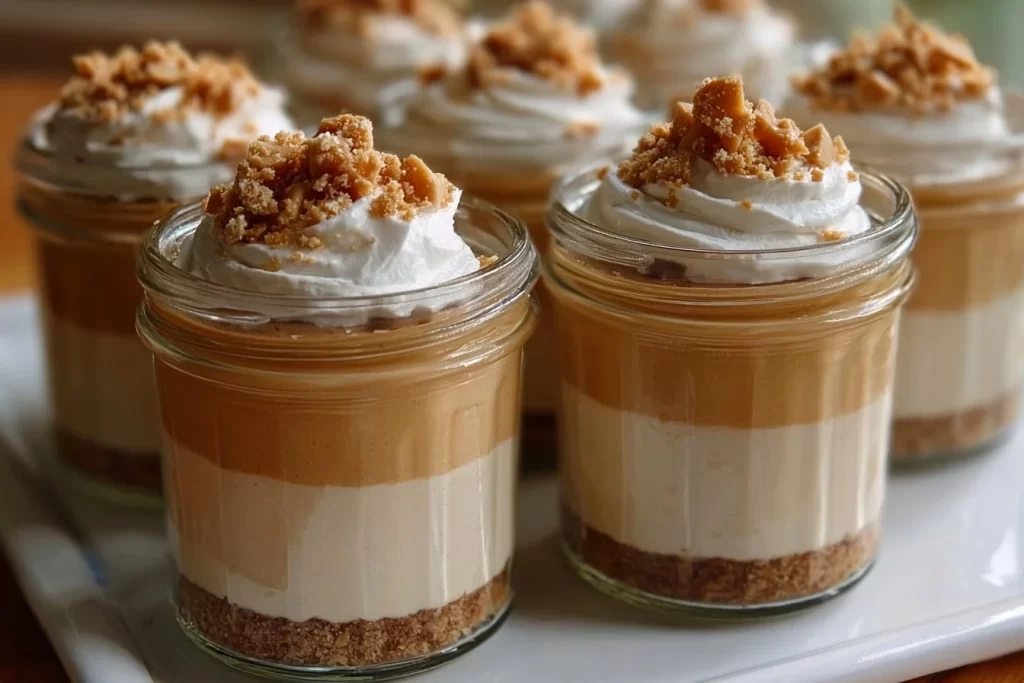
No-Bake Peanut Butter Cheesecake Jars
Ingredients
Method
- In a mixing bowl, beat the cream cheese and peanut butter until smooth.
- Add powdered erythritol and vanilla extract, mixing until well combined.
- In a separate bowl, whip the heavy cream until stiff peaks form.
- Gently fold the whipped cream into the peanut butter mixture.
- Spoon the mixture into individual jars or serving cups and chill in the refrigerator for at least 2 hours before serving.

